Introduction to Photoshop 7.0
Introduction
Photoshop is a very large and intimidating program at first glance. However, after using it for a while, you'll quickly discover that there are only a handful of features that you'll use all the time. This tutorial walks you through the most important features of Photoshop so you can get started using it. Most of what is covered here should work fine in almost all versions of Photoshop from 5.0 through the future.
The Tutorial
Opening Images
Opening an image in Photoshop is just like with any other application. By selecting "File | Open..." on the menu, you'll get the familiar File Open dialog where you can search for your files and open them. Note that you can also open more than one file by Ctrl-Selecting files, or Shift-Selecting to select a range of files. Play around a bit in here to get used to that.
To keep yourself from damaging your original digicam files, it is a really good idea to only work on copies of those original files. Keep your originals in a separate "safe" folder on your hard drive, and copy them to a working folder where you can mess with them. There's nothing worse than finding out you've just destroyed your original digicam image.
Rotating
Sometimes you'll turn the camera sideways to shoot in "Portrait mode" to fit your subject in the frame. Photoshop lets you rotate your image 90° clockwise or counter-clockwise. The "Image | Rotate Canvas" menu has options for rotating 180° (upside down), 90° CW and 90° CCW.
Cropping

The Crop tool lets you cut off unwanted portions of an image. Select the crop tool, then click and drag out a rectangle on your image. You can adjust the rectangle by clicking and dragging the little squares at the corners. You can also rotate the rectangle by clicking and dragging outside the rectangle. This lets you straighten a slightly crooked image.
Resizing
Once the image is cropped to your satisfaction, you have to decide whether or not you want to print this image. If you want to make a large print of the image, do not resize it, leave it at its original size. This gives the printer (or print service) a lot of resolution to work with, which results in a nicer print.
If, however, your goal is to create an image that will only be viewed on the screen, or that you will only send in email, you can resize the image to be more appropriate for those goals. My preferred tool for doing this is "Fit Image". In the menu, select "File | Automate | Fit Image...".
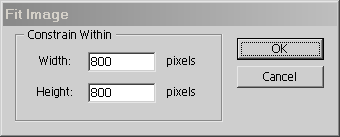
For screen viewing, I set both width and height to 800 and press ok. This gives me an image that looks fine on the screen, and is also suitable for printing a 4x6. For sending in email, I might use 400 for both the width and height. This gives a much smaller file that won't bog down your or the recipient's email.
Older versions of Photoshop do not have "Fit Image", so you have to use the "Image | Image Size..." dialog which can be very confusing.
Let me know if you are interested in an upgrade to this tutorial to include that.
Levels
The last step before saving is to check the brightness and contrast of the image. The most important tool to learn first is "Levels". From the menu, select "Image | Adjustments | Levels...". This brings up the Levels dialog:
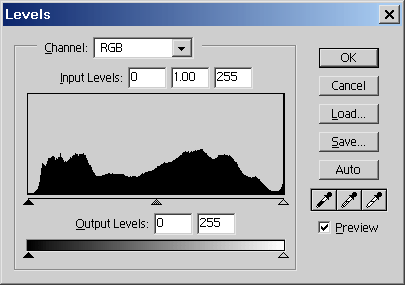
This one dialog lets you make all sorts of changes to your image. For this tutorial we are going to focus on getting the contrast right. The graph that you see in the upper portion of the Levels dialog is called the "Histogram". It is a count of the number of points in an image that are a certain brightness. The x-axis of the histogram goes from black on the left to white on the right. You can see on the histogram above that this particular image has values that range from full black all the way up to full white. Because of this, there is probably little we can do to improve the whites and blacks in this image. However, take a look at the following histogram:
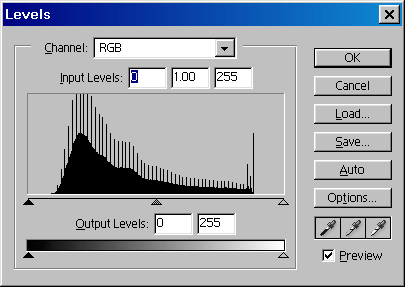
This graph does not spread all the way from full black to full white. As a result the image will have low contrast.
To fix this, we use the small triangle controls under the graph to adjust the "white point" and "black point".
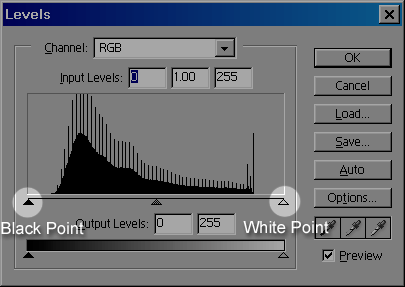
First, we adjust the white point by grabbing the white point triangle and dragging it to the right edge of the graph:
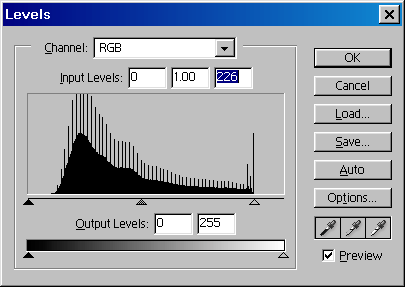
Next, we adjust the black point by grabbing the black point triangle and dragging it to the left edge of the graph:
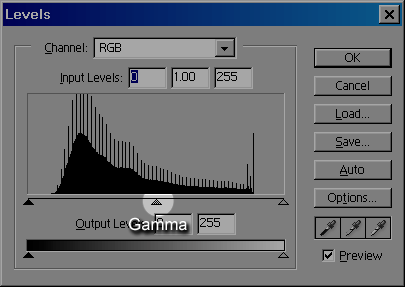
Now that we have optimized the white and black points, we can try playing with the middle control which is called the "gamma" control. With it you can adjust the overall contrast of the image to taste.
Saving
Now it's time to save the image. Most likely you will want to save photographs in JPEG format. Just be sure to use "File | Save As..." and rename the file so you don't clobber your original digicam JPEG file. That would be
very bad. Given the original image from the digicam, you can go through this process again and perhaps prepare an image for some other purpose, like printing an 8x10.
In addition to always working with copies of the original files, I always use "File | Save As.." which will warn me if I'm about to write over the original file. I give the processed version a slightly different name by adding a "2" to the end of the filename. This keeps me from clobbering the originals. Since I always work with copies, I now have to clean up any duplicate copies that are laying around.
It's amazing how complicated loading and saving the files can be.
Conclusion
What I've presented here is an abbreviated version of my own photo retouching process. Spend some time practicing this process on your own images. Once you get used to doing all this, you can move on to my
full retouching tutorial and get a feel for more of what Photoshop is really capable of.
The most important thing to keep in mind is that these are
your images and the above process is intended to teach you how to use the tools Photoshop provides. Your goal is to make your images look good to you.
<- Go Back to my Photography page.
Copyright ©2011, SAJIDMUHAMMAD44@YAHOO.COM


 The Crop tool lets you cut off unwanted portions of an image. Select the crop tool, then click and drag out a rectangle on your image. You can adjust the rectangle by clicking and dragging the little squares at the corners. You can also rotate the rectangle by clicking and dragging outside the rectangle. This lets you straighten a slightly crooked image.


